Finnabair's Store7 Dots StudioFlickrPinterestFacebookTwitterBlog
Showing posts with label Viva Decor. Show all posts

2015-01-30

Boyhood

Today we're taking a break from all the girly butterflies and flowers. ;)
This beautiful project might make a perfect gift for some special gentleman.


Usually my works are soft, girly, feminine. I like shine, sparkle, glamour. I like girly colours. :)
But sometimes I have a chance to do something different - for example when I want to make a gift for someone else.

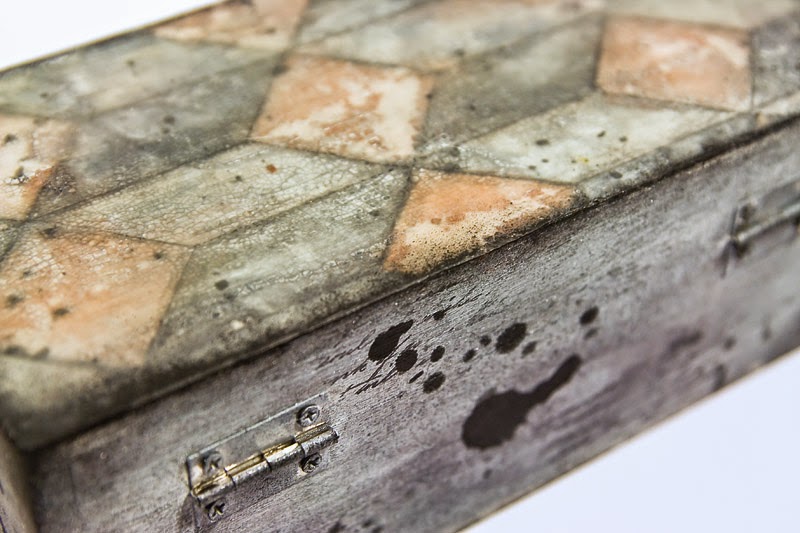
This time I wanted to do something "boyish". A special box for a man. Something to keep boyish treasures - maybe some pens and pencils? or cigarettes? or maybe men's jewelry? or maybe toy soldiers? ;) Who knows. :)


I covered this wooden box with a thin coat of gesso and then started "colouring". Mainly with black and grey.
Black chalkboard paint is one of my favourite paints lately. It's black, it's opaque and it has a matt finish. Perfect! I've used it on all the edges and added some "stains" and "splashes" (amazing stencils by Tim Holtz - my absolute favourites!)
And the rest of the colouring I made simply using all kinds of mists and sprays. I treat them like paints - using a brush.


The top of the box is a little bit more complicated -There's a little bit of texture from the crackle paint and a coat of bees wax on top - it gives a very special "soft and foggy" finish.

The rest is more simple - just geometrical drawing (soft pencils and thin waterproof pens) and more colouring with Glimmer Mists and Lindy's Stamp Gang sprays.
Looks cool, doesn't it? ;) 

Materials from Mixed Media Place:


p.s. Last minute chance to grab a 10% discount on all the products from our Pens&Pencils shelf!
It's just enough to enter this code at the chceckout:
haPENS

The offer's valid only 'till January 31st!
For some great inspirations about our promo products, see this post by Pascale and Riikka!

2014-08-05

La Source

Have you seen any fascinating new places these holidays?
Make sure to capture your memories! We are sure you will be inspired by today's beautiful creation by Pascale!


Hello!
Today, I'd like to share a photo with autumnal colors, even if it was taken in the spring.
It's the hot thermal spring of Jonzac (a small town in the South West of France) that gives the color to the stone.


To make my background, I followed a tutorial from Tiphanie you can find here.


I've used two kinds of acrylic paints: some matte (Distress Paint) and the other shiny (Silks), as I wanted some contrast. Instead of molding paste, I've used crackle paste as I love the effect of this one.


When my background was dry, I've added some random stamping and some pebbles.


I've colored the black paper in which I've die-cut the greenery with diluted Silks in order to preserve the translucent effect. On the contrary, I've colored the title's letters with a non-diluted Silks to obtain a metallic effect.


Supplies from Mixed Media Place:


2013-12-16

City Landscape - mixed-media painting by Linda/Pejzaż miejski - kolaż mixed-media Lindy

Hi again friends - today we've got something truly special for you! We are all very excited about this project - full-sized canvas? This is more than just an eye-candy! Ladies and gentlemen - here it is: Linda and her mixed-media collage painting!

Witajcie ponownie, przyjaciele - dziś mamy dla Was coś specjalnego! Już nie możemy się docczekać, aby pokazać Wam projekt Lindy! Pełnowymiarowy kolaż na płótnie? To coś więcej niż uczta dla oczu! Zapraszamy!


Hi folks, Linda here today to show you a fun project I made with lots of products from Mix Media Place shop.
Witajcie, z tej strony Linda - chciałabym wam pokazać interesujący projekt, który zrobiłam w oparciu o produkty ze sklepu Mixed Media Place. 


I had a 20x60cm canvas so I used that, but you could use any size of stretch canvas for this project. I started to add texture to the background by adding scrap paper and gesso, then I added modeling paste to add more texture. ( remember to let dry between the layers) To create the structure of the building I've used mesh tape (for drywall joint strengthening) and PVC punchinella rectangle Grid from Gauche Alchemy. I used heavy gel medium to add this to the canvas. I've also used various gel medium with texture to add even more texture to the picture.

Ja miałam płótno o wymiarach 20x60 cm ale oczywiście możecie użyć do podobnego projektu blejtramu o dowolnym wymiarze. Zaczęłam od nałożenia warstw: papieru i gesso, potem nałożyłam pastę strukturalną (modeling paste) aby dodać więcej struktury. (Pamiętajcie - to ważne, aby praca mogła wyschnąć pomiędzy nakładaniem kolejnych warstw!). Aby stworzyć kształty budynków użyłam taśmy siatkowej (popularnej do wzmacniania tynków na ścianach) oraz kawałków prostokątnej punchinelli z Gauche Alchemy. Przykleiłam je do płótna używając żel medium  - i użyłam żeli aby dodać więcej faktury mojej pracy. 


When happy with all the texture I let it dry until the next day. Then I started adding color. Starting with splashes of yellow Ecoline, then different blue and white. I did this in several steps and dried the layers with the heat gun. To add some extra dimension/shadow I added various colors of Twinkling H2o and Inca Cold Metallic rub. Finally I added some lines to the image by drawing with Indian Ink and a thin paintbrush.

Kidy byłam już zadowolona i ilości warstw i faktury pozwoliłam projektowi wyschnąć - wróciłam do niego dopiero następnego dnia. Wtedy zaczęłam dodawać kolory. Pierwsze były chlapnięcia żółtą Ecoliną, potem niebieskie i białe. Pomiędzy kolejnymi krokami suszyłam płótno nagrzewnicą. Aby dodać więcej głębi cienia użyłam rożnych kolorów akwarelek Twinkling H2o i past metalicznych Inca Gold.  Na koniec domalowałam cienkim pędzelkiem i Tuszem Indyjskim kilka linii kończących kompozycję. 


Thank you for looking and wish you a beautiful day.
Dziekuję za odwiedziny i życze wam miłego dnia.
Linda

Products from Mixed media Place Store/ Produkty ze sklepu Mixed Media Place: