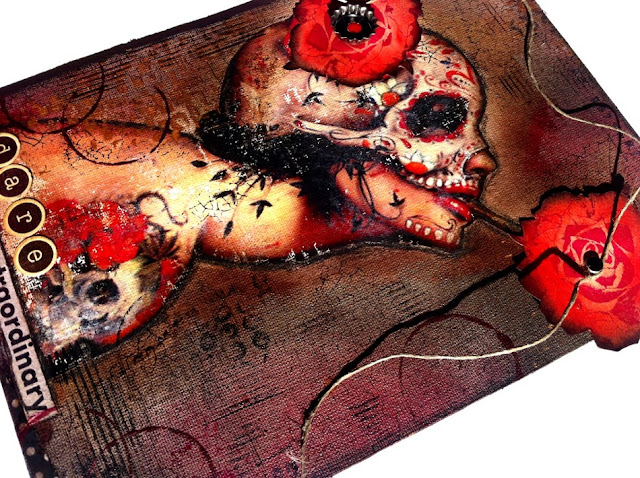
From a few months I’m fascinated on different functionality of Gel Medium. I never before had the possibility to use it till when I bought my first tube. Now it is one of my favourite mixed-media products.
Od kilku miesięcy jestem zafascynowana różnorodnymi możliwościami zastosowania Gel Medium. Dopóki nie kupiłam swojej pierwszej tubki nigdy wcześniej nie miałam okazji używać tego medium w swoich pracach. Teraz jest to jeden z moich ulubionych produktów.
Today I would like to share with you very simple technique how to transfer the picture* on canvas using gel medium.
I saw a lot of different techniques on different blogs but this one is very easy and effect also satisfied me so much. If you would like to know how I create this work, please read the “step by step” text below:
Dziś podzielę się z Wami bardzo prostą techniką transferowania ilustracji* na płótno właśnie przy pomocy Gel Medium. Spotkałam się już z różnymi technikami transferowania ilustracji ale ta jest wyjątkowo prosta a efekt w pełni mnie zadawala. Jeśli chcecie dowiedzieć się jak stworzyłam tą pracę to przeczytajcie , proszę krótki instruktaż krok po kroku poniżej.
You need:
1. Canvas and gesso or “ready to use” stretched canvas
2. Gel medium
3. Paintbrush
4. Favorite picture
5. Heat tool (not necessary)
Będziesz potrzebować:
1. Płótna i gesso lub gotowego podobrazia malarskiego
2. Gel Medium
3. Pędzla
4. Ulubionej ilustracji
5. Opcjonalnie nagrzewnicy
Step1: Prime the canvas with gesso and wait as long as the surface will be totally dry. You can use heat tool too.
I used the ready to use stretched canvas 13x18.
Krok1: Zagruntuj swoje płótno przy pomocy gesso I poczekaj aż zupełnie wyschnie. Możesz użyć nagrzewnicy.
Ja użyłam gotowego podobrazia wielkości 13x18 cm
Step2: Paint the right side of the picture wuth Gel Medium.
Krok2: Nanieś dość grubą warstwę Gel Medium na „prawą, właściwą” stronę ilustracji.
Step3: Put picture with the painted side to canvas and gently smooth the surface.
Krok3: Przyklej posmarowaną stroną ilustracje do płótna i delikatnie wygładź powierzchnię.
Step4: Wait as long as the picture will be dry (even a few hours). Optionally you can use heat-tool.
Krok4: Poczekaj tak długo aż ilustracja zupełnie wyschnie i przyklei się do płótna. Trwa to kilka a nawet kilkanaście godzin. Możesz użyć nagrzewnicy.
Step5: Using your finger, roll the left side of the whole picture . In this way you remove only back of your picture, one layer of paper. The front side of a picture will stay on canvas.
Krok5: Kiedy ilustracja jest sucha, zroluj jej wierzchnia, lewą stronę palcem w taki sposób, że usuniesz jenda wartwę papieru a kolorowy obrazek zostanie na płótnie.
Tips & ideas:
Wskazówki i pomysły:
1. I always roll paper (remove this “left side of picture”) the wet finger. It’s easier way.
1. Łatwiej jest zrolować wierzchnią wartwę ilustracji przyklejonej Gel Medium kiedy delikatnie zmoczymy palucha wodą.
2. Remember that gel medium during fixing picture to canvas very often migrates outside the borders of picture. In this area your canvas will absorb other medias like mists or inks differently than part of canvas without gel medium. To avoid this effect I remove the gel medium from canvas using baby wipes.
2. Pamiętaj, że po dociśnięciu posmarowanej ilustracji do płótna Gel Medium wycieka na zewnątrz poza granice obrazka. Po wyschnięciu w tym miejscu płótno będzie inaczej przyjmować media takie jak: mgiełki czy tusze. Zwykle, zaraz po przyklejeniu usuwam nadmiar Gel Medium, ktore wydostało sie poza ilustrację mokrymi chusteczkami dla dzieci.
After transferring picture you can unleash your creativity and use several different medias to create extraordinary background. I used Glimmer Mists and Distress Inks and Distress Stain to color the background around the picture. The names of colors you can find on the bottom of the post.
Po przetranferowaniu obrazka możesz już śmiało uwolnić swoją kreatywność i przy pomocy różnych mediów stworzyć niepowtarzalne tło. Ja użyłam różnych kolorów mgiełek Glimmer Mists oraz tuszy Distress Ink oraz Distress Stain. Kolory znajdziecie poniżej tekstu.
To create 3D impression I stamped black StazOn some designs in different areas of my work. Also on the picture.
Aby stworzyć wrażenie trójwymiarowości odbiłam czarnym tuszem StazOn kilka wzorów stempli. Również na postaci z obrazka.
On the left side I used gold LuminArte Silks and stencil to create some irregular texture pattern. Few circles, it’s also pomegranate LuminArte Silks.
Po lewej stronie używając złotej farbki LuminArte Silks oraz maski stworzyłam nieco wypukły wzór. Kilka kółeczek również odbiłam używając farbkę LuminArte Silks z tego samego zestawy co złota, w kolorze różowo-fioletowym.
The main embellishments on my work are two handmade roses fixed on sponge. At first I stamped the 3rd Eye stamp rose with a black-cherry StazOn on a cream paper. Next using Distress Ink in red and walnut stain color I colored the picture. Finally I cut and adhered it to my canvas using small double-sided foam.
Główną ozdobą są dwie własnoręcznie stworzone róże. Na początku stempel 3rd Eye „róża” odbiłam ciemno-czerwonym tuszem StazOn na kremowym papierze. Następnie go wytuszowałam tuszem Distress Ink w kolorze czerwieni oraz ciemnego brązu. Po wycięciu przymocowałam róże na gąbeczkach dystansowych do płótna.
That’s all :) I encourage you to experiment with Gel Medium.
I to wszystko. Zachęcam Was do wypróbowania Gel Medium.
Take care
* I used illustration: Brian M. Viverous "Viva La Muerte"
Supplies from Mixed Media Place | Materiały ze sklepu Mixed Media Place:


Mega czad :) Ja robiłam transfery nawet na kleju Magik, super technika, uwielbiam :)
ReplyDeleteDziękuję, Jamajeczko. Wiesz, że pierwszy transfer robiłam właśnie w oparciu o Twój opis na blogu :)
Deletepiękna praca! Efekt cudowny!
ReplyDeletewow. niezłe. brakuje mi tylko gel medium by to sprawdzić:) ale już niebawem... :)
ReplyDeleteFantastyczny efekt! Bosko!!!
ReplyDeleteOh wow, this is SO beautiful, and thanks for sharing how to transfer to canvas!
ReplyDeleteI love the image you used, the whole canvas is gorgeous!
ReplyDelete